How to Pick the Right Canvas Size and Resolution
What resolution and size is the best for drawing in Clip Studio Paint?
It is all a matter of personal preference, most often informed by experience. Higher DPIs will allow you to publish your image at larger physical sizes. Smaller canvases will be easier for a computer to store in memory and lead to a faster computer experience. You need to choose values to balance out your drawing needs versus the strength of your computer.
Clip Studio Paint is not a horrible memory hog, though. You’d be surprised how big a file it can handle before things start to slow down. So let’s ignore that for now. Let’s talk about optimizing for user happiness and end product usefulness.
The “New” Window
Let’s start a new illustration. You can use the menu and navigate to File -> New or use the keyboard shortcut CMD-N (Mac) or CTRL-N (Windows)
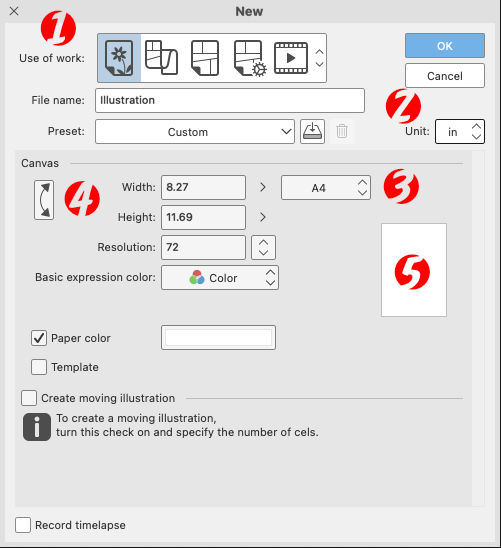
This is the window you’ll see in CSP v 1.10.10. Older versions have some very minor differences. It’s essentially been the same window, functionally, for years now.
First, you need to tell CSP that you just want to draw on the screen. You’re not looking to do an animation or create a comics page or a Webtoon style vertical scroll comic or make an entire comic book (which you can’t do in CSP Pro, anyway.)
That’s what those five lineart-filled squares at the top of the window are for (1). Click on the one to the far left to tell CSP you just want to have a canvas to doodle on.
Second, you need to pick what measurement you’re using to find these page sizes. That’s in a drop down all the way over on the far right side of the window. (2) You’ll likely want to use “in” for inches, or “px” for pixels.
Choosing “in” means you have an easy way to tell the difference between A4, A5, A6, B4, B5, and B6 sizes (3). A4, for example, is the closest to 8.5″ x 11″ that you’ll get.
To get an idea of the dimensions of the canvas you’re choosing, there’s a white silhouette of the page (5) in the window.
If you’d rather reverse the dimensions to create a wider page than tall, click the arrows to the left of the Width and Height options (4). The white silhouette will change along with the numbers. I often draw in my sketchbook in landscape orientation, so I’ll switch those dimensions around often.
But What Canvas Size Do You Choose?
As is the answer to so many other questions like this, the answer is a solid, “It depends.”
But that’s not what you want to hear. Let me give you my shortcut idea.
Do you have a sketchbook you draw in all the time? Do you just use random sheets of paper you steal out of the printer?
That’s the size you choose. Start with what’s comfortable. Start with an aspect ratio you’re familiar with.
Don’t stick with it forever. Mix things up once in a while to test new things. Change the canvas size to handle something you’re drawing for a specific space.
But when you’re starting? Set the width and height to the size of the paper you draw on most now. I bet for most people that’ll be 8.5″ x 11″. If you live in your sketchbook, then maybe you’re looking more at 5.5″ x 8.5″ or 11″ x 14″. If you want to be a professional comic artist, you might want to work at something close to the standard 11″ x 17″ pages that comic artists use. (They usually draw inside a 10″ x 15″ section of that. You can buy a two dollar template for this kind of thing, if you’re so interested.)
If your plan is to paint digitally with Clip Studio Paint — and the brush tools are an awesome fit for that — then look at real world canvas sizes. That can go anywhere from 6″ squares to 20″ x 24″
If you’re the type to emulate Todd Nauck and draw on Post-It Notes, then set it to 3″ x 3″ or 4″ x 4″. (If you are emulating Todd, be sure to use a Copic Marker brush to color it in!)
Or, Do The Math
You can convert from pixels to inches pretty easily. Remember that DPI stands for dots per inch. If you’re drawing at 600 dpi and your canvas is 6000 pixels wide, do the math:
6000 pixels / 600 dots (pixels) per inch = 10 inches.
You can work it out in reverse, too. If you have the measurements showing in inches, multiple that by the dots (pixels) per inch to get the number of pixels in the dimension.
600 dots (pixels) per inch x 10 inches = 6000 pixels
We return you now to your less mathematically challenging tutorial…
Which DPI Do I pick?
300.
It’s not just an awesome Frank Miller comic.
It’s a printable dpi should you later decide to print something, and it gives you enough fine grain control to zoom in and add details without letting you go so small that you waste time on things nobody will ever see.
If you’re drawing something simple for the web only, you can get away with 72, but realize you’ll never be able to blow that up cleanly to anything larger, unless you’re using vector brushes only.
I tend to draw at 600 dpi, which is likely overkill, but it’s always easier to shrink something than to make it larger. I always export to 72 dpi for the web in the end, anyway. The thing I need to work on most when drawing at that size is to use thicker ink lines. The thinner lines won’t show up so well when you later downsize the image to something more web-friendly.
The Only Hard and Fast Rule…
…is that there are no hard and fast rules. Now that you know where the settings are and what they do, play with them. Experiment. What sizes fit your needs? Are you going to print with something? Then you need a higher DPI. Are you sticking with just the web? Ultimately, 72 dpi is your friend for web reproduction, but could be your worst enemy for creating your art or collecting your art in a print book edition.
Are you drawing something with lots of details? If so, give yourself some room. Use a bigger canvas size with a higher dpi. Feel free to zoom in, just remember that those zoomed in lines will look smaller when zoomed back out to full image size.
If you have a favorite resolution for a particular reason, chime in in the comments below. I’d be curious to hear how you all like to draw.
Updates
June 2016: Original article
September 2021: Updated screenshot, added details, minor tweaks.


What pen size should I use for comics?
Good info for comic making.
Why do comic makers use 11”x17” when most comics are 8.5” x 11”?
At this point, it’s probably just tradition, but it does shrink down nicely. I forget the exact percentage.
The larger page size gives them room to draw more detail. There’s a bit of a border all around the original art board that’s considered “unsafe” to draw in. Whatever the artist draws in that area may or may not appear on the final page, depending on how the comic prints out.
This is amazing. You majorly helped me save a piece when I realized how I could change the image resolution and what resolution makes sense.
What the good size for drawing fanart? I don’t wanna make it too small or too big..
It depends on what you’re drawing it for. If the ultimate output is an Instagram post, for example, then you should start at 1080 pixels square. Anything bigger than that will work, too, though it will be shrunk down for display. Draw at a size you’re comfortable with. Experiment a little. There’s really no “right” answer. Just have fun! Good luck!
I use a canvas size of 7680×4320 4times the size of 10 eighty with 300dpi its amazing what it does once you rescale your work to fit your screen… basically little to no clean up.
Sometimes, on my Tab S6 I find 300 dpi (8x12in) to be a little too much for the tiny mobile processor, so I drop it to 150 dpi for smoothness of the UI etc.
Thank you for that link to download the templates! Gonna shout you out on Twitter too. Weird I haven’t followed you there in all this time because I’ve heard of your name for like 15 years. 😂