How to Add a Brush (or Pen or Pencil)
Clip Studio Paint breaks your art creation tools into three categories: Pens, Pencils, and Brushes. It’s completely arbitrary, but it is suggested that you organize your tools along those lines just for sanity’s sake.
In this tutorial, I’ll show you how to add a brush, move a brush around to a different category, create and delete a new category, and delete the brush. As a bonus, I’ll also show you the trick for how to add multiple pencils or pens or brushes at once.
Grab a New Brush
First, download the brush/pen/tool/what have you to a directory of your choosing. Remember where it is. This will be important.
Here, I have a pack of brushes I picked up from the DAUB Brushes site, all together in their own directory.
OK, go back to Clip Studio Paint.
Preparing to Add a New Brush
The big trick with this process is that you need to pick where you want to install your brush to before you install it.
First, push “B” to go to the brushes.
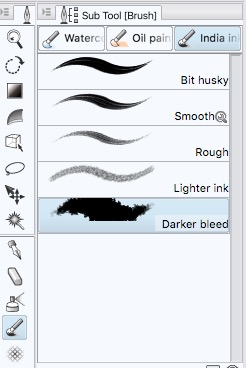
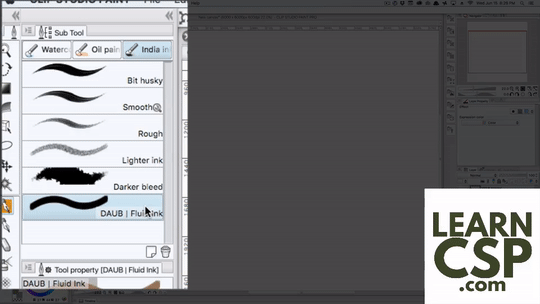
On my screen here, you can see I have three tabs named “Watercolor”, “Oil Paint,” and “India Ink.”
Keep in mind: These distinctions are completely arbitrary. They’re ultimately meaningless. You could put pens and pencils in here for all Clip Studio Paint cares. But, for consistency’s sake and your own mental health, I suggest running with this categorization of the tools. Keep the brushes together in one spot, pens in another, and pencils in a third.
For this example, I want to add an ink brush to my tool set. So let me click on the India Ink tab first.
Import the New Brush
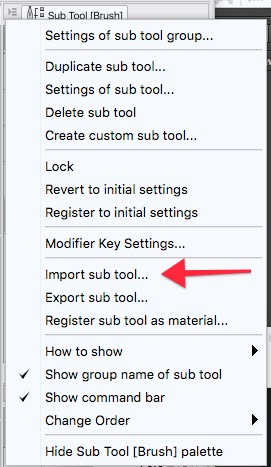
To add my new brush to this category, I click on the little button in the upper left corner here with the three lines and the arrow. The documentation refers to it as a “menu,” so we’ll call it the Brush Menu here.
That brings up some possibilities. We want to “Import Sub Tool…”
That will pop open a file picker. Sub tools have “.sut” file extensions. If your Finder is set up to show file extensions, you can read it easily enough, but don’t worry: Any files that aren’t tools will be grayed out in any case, so don’t worry about it.
Also, you can only add one brush at a time this way. You can’t shift click to get a bunch at one time, or CTRL-CLICK to pick other individual tools. Don’t bother trying.
Just pick the one you want and click OPEN. Or just double click the file name.
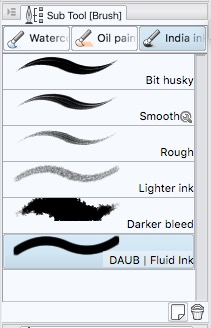
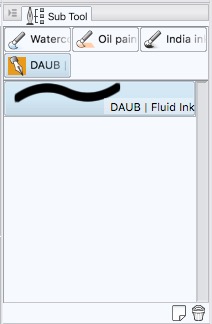
We’re going with the DAUB_Fluid_Ink brush here.
Magically, your File Picker closes and BAM! your new tool is there at the bottom of the list.
Congratulations on importing your first brush.
Move the Brush Around
Now, you can drag and drop it somewhere else in the list if you want to change the order around.
You can even create a new tab by dragging this brush into an empty spot amongst the tabs. This will create a new family of tools, which will be automatically named after this brush, in particular. You can then right click or CTRL-click on that name to change it if you wish.
You can move the tool to any other tab from that new tab by dragging and dropping it to another tab. And, if it was the only tool in that beginning tab, that tab will disappear. It lost its raison d’etre there.
For those of you who prefer a good animated gif, I give you this:
Deleting Brushes
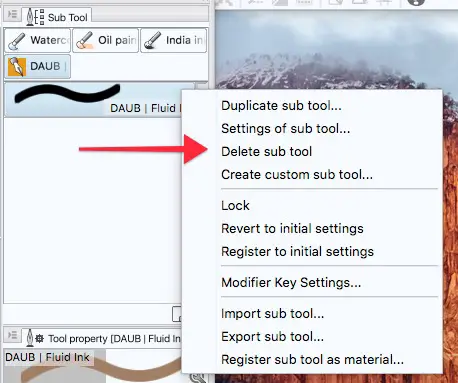
To get rid of the brush, itself, you can right click or CTRL-CLICK on the brush and choose “Delete sub tool.” You will get a confirmation box before the deed is done. You won’t see one in this example because I once clicked the “Do Not Show Me This Window” option, so it never pops up for me anymore..
If you DELETE a tool like that when it’s the sole tool in a tab, the tab will disappear also. It’s not just moving the tool that will collapse the tab, but also deleting it.
Here, I’ll show you:
- Import Tool.
- Move it to create a new tab.
- Right Click and delete tool.
The tab is now gone along with the brush.
Multiple Brushes
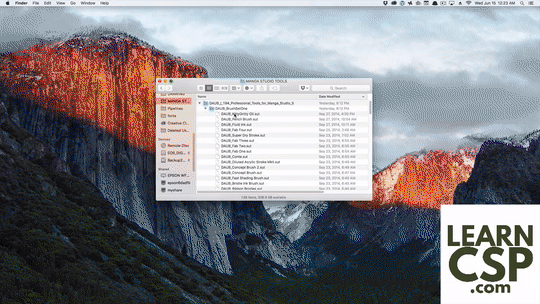
There is a trick to adding multiple brushes at once. You have to open a Finder window on the screen. Here’s where you can CTRL-click individual brushes, or just shift-click to highlight a bunch that are already in a row.
Then, click back to Clip Studio Paint. Now, drag and drop that brush or bunch of brushes to an empty spot in the tab where you want to add them. In the animated GIF below, I have the Finder window inside of Clip Studio Paint’s proscenium of tools, just behind where an image I’d be working on would be. You can also move brushes over to Clip Studio Paint from a window on another monitor, if you have one.
The trick here is that both the Finder window and CSP have to be visible at the same time. If you have that, you can pull this off.
After that, you can move them around to the different tabs if you so choose. Remember: stay organized!
There is no way to delete a group of tools at the same time. At least, none that I know of yet. Leave me a comment if you know that trick.
And that’s how you add, move around, and delete brushes, pens, and pencils.


Thanks for the info. Instead of deleting the brushes from the brush palate, how do I uninstall brushes that I registered to the library. I made a couple tests brushes and materials and now they are filling up my brush library and it taking me a long time to scroll through them to find the ones I need.
my issue is I have two machines. I just wanted to find where the brush files are stored as a whole so I could copy the files, and zip them so I could reload them on the other machine x.x
Excellent instruction. BTW- to make a pencil of a particular color, such as a NPB pencil, do I have to start by creating the tip and registering it? Or is there a way to simply copy a pencil from CSP, then set the color via the sub-tool detail? If the latter is possible, I have yet to figured out how.
I believe you would have to right click on the pencil, then Duplicate the Sub Tool first. That lets you make changes to the color and everything else..
Why are you using Mac-only terminology in a general tutorial?
You talk about Finder like OSX was the only OS in the Universe. At the very least you should mention that you are talking about how it’s done on a Mac specifically, but would be even better if you mentioned the Windows equivalent as well, or just use general terminology like “file browser”.
Not everyone in the World uses a Mac. Actually, the majority of people don’t. Just had to explain someone confused by this article that Finder is not something in CSP, after they were unable to find it.
If you make generic tutorials for people out there you should avoid using platform-exclusive terminology and methods.
I don’t own a Windows machine I can test CSP on. I wouldn’t want to write a tutorial in which I guessed at the right terminology and shortcut keys.
Funny enough, I use a Microsoft keyboard with my Mac and had to remap the keys to work like a Mac keyboard, so it’s already confusing enough with those translations I need to do when writing a tutorial.
WIndows tip: If you select multiple *.sut files using the file explorer you can drag them onto the sub-tool in CSP and import so multiple files at once.