How to Crop an Image in Clip Studio Paint
When you’re using a photo editing application, it’s easy to crop a picture.
But in a tool like Clip Studio Paint, how to crop an image may not seem so obvious.
You have to think of it in a slightly different way.
You’re not cropping your art. You’re cropping the canvas your art is drawn on. Cut off the canvas and you’ll cut off the area your drawing has to sit on..
There is an easy way to do it, and then there’s a harder way that I’ll walk you through because you might really like numbers.
The Easy Way
Go the Selection Tool –> Rectangle.
With any luck, the selection tool is on that stack of tools that, by default, line the left edge of your screen. This is the one that looks like a dashed line in the shape of a square.
Then, go to Edit -> Crop
That will crop your canvas to the rectangular area you chose.
The good news is, all of your drawing is still there, even though the window into it — or the canvas it’s layered on top of — has been cut down to this size. If you choose the Move Layer tool (which looks like four arrows pointing north, south, east, and west), you can move your layers around and still see all the art that’s effectively off the canvas now.
In theory, you could transform the entire layer and shrink it down to fit on the new canvas if you wanted.
But what if you want to expand your canvas? If your drawing has grown bigger than you thought and you need more room so nobody’s hand or foot gets cut off along the edges, how can you make it grow?
There’s a different way to do that. It looks more gnarly than it really is, but it’ll also work when you’re trying to shrink the canvas. Let me show you
The Hard Way (Numbers!)
This is the way to grow your canvas, but it’s also the best way to go when you know the specific size you want your canvas to be (larger or smaller), whether it’s in pixels or inches.
Unfortunately, it’s not so easy as drawing a rectangle over the portion of the canvas that you want to keep. You need to do it with numbers. It’ll take some rough guesswork and lots of corrections, but it is possible.
Go to Edit -> Change Canvas Size
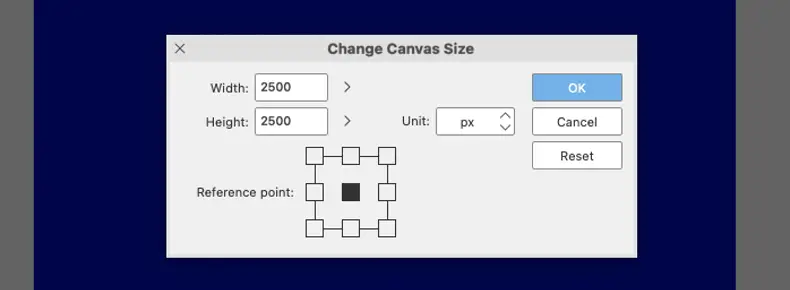
This window pops up:
This might be a little confusing at first, but you’ll get the hang of it quickly.
That “Reference Point” Tic Tac Toe board is the most important part of this window, because that’s where Clip Studio Paint decides where to take away from or add to the canvas based on the new numbers you input in the Width and Height fields.
The reference point (some other applications might call this kind of thing an anchor point) is where the current canvas gets pinned down, whatever shape or layout it is. By default, that starts in the center. When you lower the number in the width field, half of the difference will be taken away from the left side on the image, and half on the right. When you lower the number in the height field, half of that difference will be removed from the top, and half from the bottom.
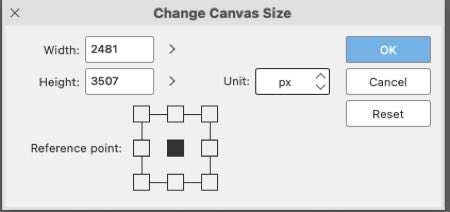
If you want the difference in numbers to be taken from only one side of the image, then you need to set the reference point to the opposite side of that tic tac toe board. So if you want to remove 100 pixels from the width on the left, then you need to choose the reference point on the right. That will anchor your image to the right and remove the pixels from the opposite side, away from the anchor.
If you change the number to be a larger one, the new pixels will also be added to the opposite side. If you pin the image to the right and increase the width by 100 pixels, CSP will add those 100 pixels to the left side of the image.
Tool Tips and Tricks
If you’ve tried this yourself by now, you’ve also seen one very helpful user interface trick that I haven’t mentioned yet. As you type in a new number in one of those fields, CSP starts to highlight the new canvas. As you continue to type the number in, it updates with every keystroke. You’re still guessing at what the proper number should be, but CSP is very helpful in showing you how close you are. You can adjust accordingly.
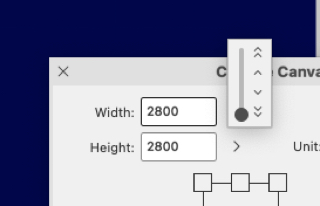
The chevrons to the right of the Height and Width field do bring up a slider you can use instead of typing in new numbers. It will change the highlighted portion of the canvas to match where the slider is at all times. I find this tool less useful, though, because the slider is very small. You can make huge changes to the canvas size with the slightest touch of the scrubber there. It maxes out at 50,000 pixels in either direction. My original image is not even a tenth of that number, which throws off the scale. I suppose if you work at a much larger size, this slider might make more sense. But if you’re trying to cut down a canvas from 2500 pixels to 2000 pixels, good luck.
Next to the slider, though, is another series of chevrons: two single chevrons pointing up and down, and two double sets pointing up and down. The single chevron adjust the canvas a pixel at a time. The double chevrons adjust it by 100 px with every click. That might be more useful. I tend to avoid it because it’s such a tiny button to have to try to press.
Around the Tic Tac Toe Board
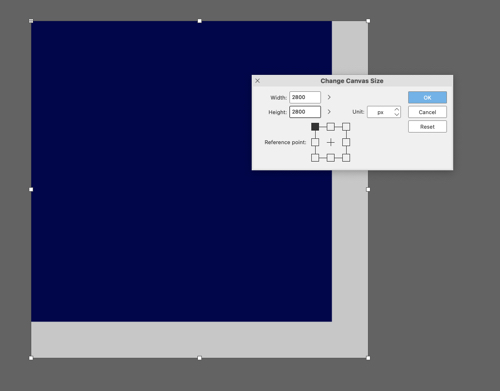
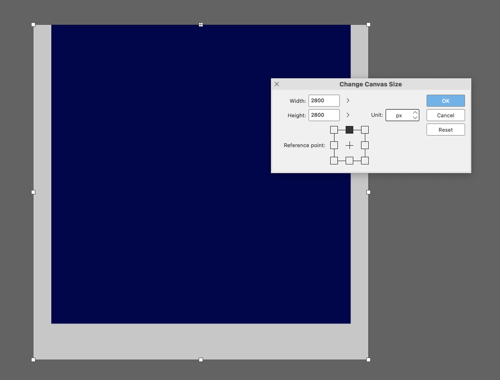
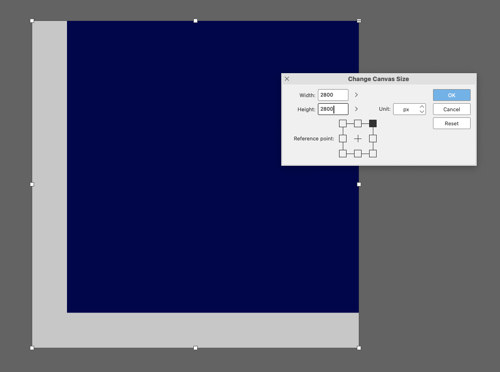
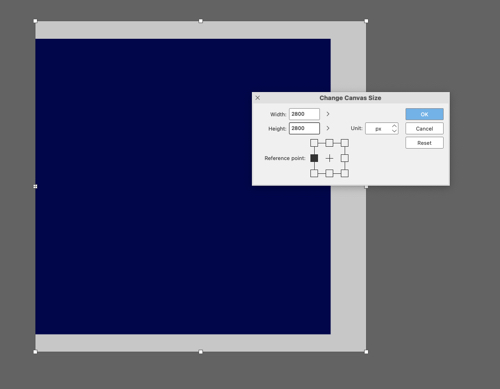
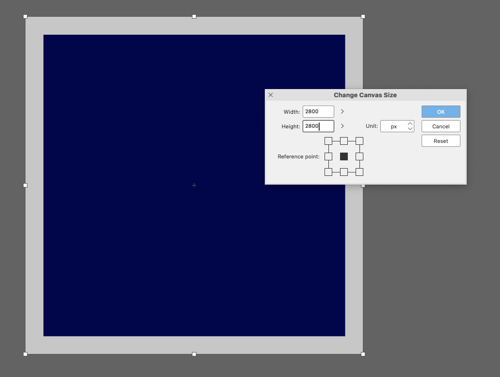
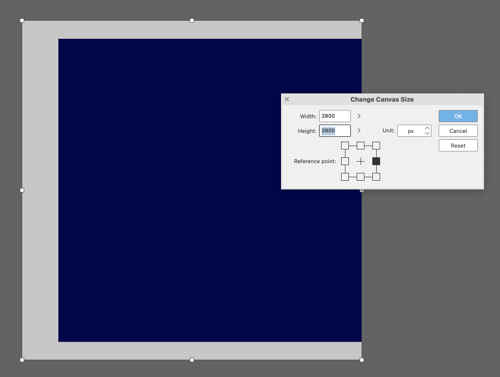
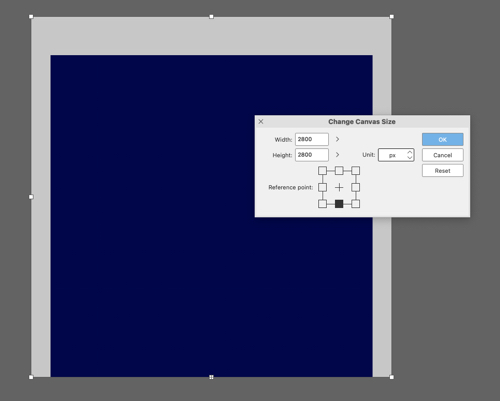
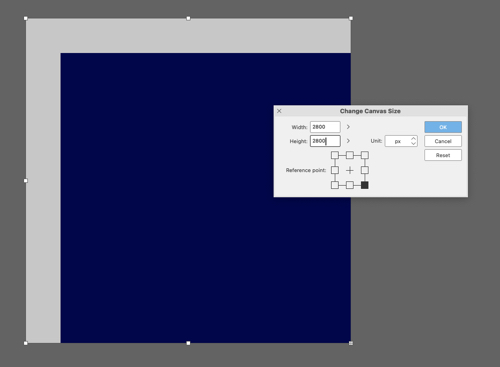
Logically, everything works from there. I’ll spell it out. I started here with a solid blue canvas at 2500 x 2500 pixels. In each of these examples, I extended the canvas out to 2800 x 2800, but with a different reference point each time.
If you’re on an iPad or a desktop display, things will be wide enough that these screen shots will format in a 3 x 3 grid. Each screenshot is placed where the reference point used in it is. If you’re on mobile, just look at the modal window in the screenshot to see where the reference point is.

Or, to explain it in english:
The left anchor point changes the canvas width off to the right, while the height will change equally on both the top and bottom.
The right anchor point changes the canvas width off to the left, while the height will change equally on both the top and bottom.
The bottom anchor point impacts the top of the canvas in height, while the width changes equally on the left and right.
The top anchor point impacts the bottom for the canvas in height, while the width changes equally on the left and right.
The center anchor point always extends or shrinks evenly in both directions for height and width.
The top left corner changes the canvas width to the right and the height at the bottom.
The top right corner changes the canvas width to the left and the height at the bottom.
Lower right moves the width to the left and the height to the top.
Lower left moves the width to the right and the height to the top.