Indicators versus Sliders
When I started to write this post, I hated indicators and thought sliders were the One, True Way to go with Clip Studio Paint.
In doing further research and playing with settings, I found a place for indicators. I still prefer sliders, in general, but I wound up with a grudging appreciation for the usefulness of sliders.
Defining Our Terms
This is a slider:
This is an indicator:
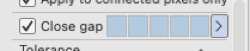
They both, ultimately, do the same thing. They adjust the value of a specific tool from lesser on the left to greater on the right.
With a slider, you can land on any value. With an indicator, you only get five choices.
Why use one over the other?
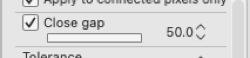
Where this topic came up for me was in the Fill Gap section of the fill tool. It allows you to let Clip Studio Paint assume that you meant to enclose an area given a gap of a certain size. So when you hit the Fill key (‘F’ by default) and the area you’re filling is enclosed by a line that’s not connected by about two pixels, CSP stops the fill before it expands out to the rest of the drawing.
By adjusting the strength of the Gap Fill tool, CSP will allow for a larger opening in that perimeter.
What I discovered in using the Gap Fill is that I generally use all or nothing. I didn’t need all the in-between steps. When entering text for lettering, I might see a difference between a font sized at 10 versus 11, or even 10.2. When adjusting the amount of gap I want CSP to fill in with a color, though, I usually ask it to close the biggest gap it can find, or none at all.
In that case, I only need two options: Far left and far right. Sure, you can do that with a slider, but the interaction with an indicator in that situation feels quicker and easier. Click the first square to stop a fill before it gets to only the tiniest of openings; click the second square to assume any large opening is meant to be closed. (Even then, the Gap Fill has its limited and won’t stop the color beyond a certain sized opening. Don’t say I didn’t warn you!)
Indicator Settings
Here’s an even cooler trick you can do with the settings when you want to try a power user move. You can redefine the values of those squares. If you right click or CTRL-Click on the indicator somewhere, you’ll get a pop up menu. (You can also click on the wrench in the bottom right corner of that window pane.)
Click on Indicator Settings to bring up this window:
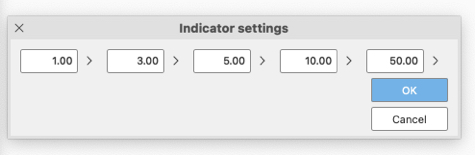
You can change the values for all of the squares through this interface. If you wanted to, you could keep the first four values the same, and just move the last value to the biggest possible value. It’s up to you.
In the case of the Gap Fill, you can change the largest value to any number up to and including 50. That is a wide open spot to let the computer fill in, but it works.
CSP stops you from messing up the left to right dynamic on these settings, by the way. If you enter a value that’s greater than the one on its immediate right, CSP will adjust that next value to the same number. The reverse is true moving to the left, where CSP expects small and smaller value.
Switch Between Slider and Indicator
This is the same window, by the way, where you can change the slider to an indicator or vice versa.
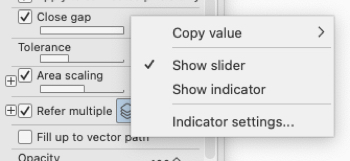
After right clicking/CMD-clicking on the item, two of the available options in the pop up window are “Show Indicator” and “Show Slider.” Click on the one you want to use.
These changes can be made for any and all sliders and indicators. You’ll likely have different preferences from tool to tool.
You can make them all the same, if you want, or match the ones that work best to the tool you’re using. Don’t do it all at once, though. That’s madness. Change them as you use them.
The good news is, CSP lets you make those changes, and it will remember them in future use.